Build Your Own Notion Safari Extension
After becoming a heavy Notion user, I attempt to utilize its functionalities to make it a personal information hub. However, the lack of official Notion extension for Safari really disturbs me as a heavy Safari user. And in this article, I am trying to explain how I created one from scratch.
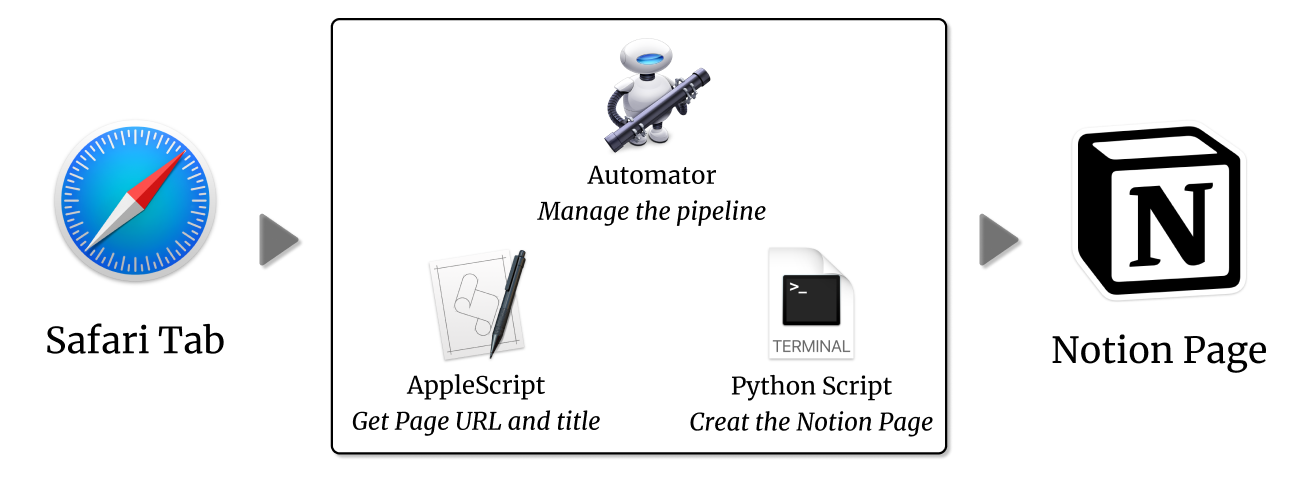
To automate the process of adding browser links to notion, there are three major steps:
- Automatically/Programmatically fetch the Safari URL link
- Determine which Notion page to save
- Add the link to the given Notion page in a proper format
And maybe finally we want to bind the tool to some system services or add shortcuts to further improve productivity. Let’s start and investigate them one by one.
Tools
We will be touching the very basics of the following tools. So don’t worry if you are not familiar with any of them. I will try to explain the code as clearly as possible in the rest of the article.
-
AppleScript/JavaScript for macOS Automation Scripting 1
-
Python and
notion-py -
Shell script
Fetch the URL and page title from Safari
MacOS provides a series of tools to enable the interaction with the applications and operating systems programmatically. Among them is the scripting language based on AppleScript or JavaScript. Let’s open the Script Editor on Mac first and create a new script named URL-Fetcher.
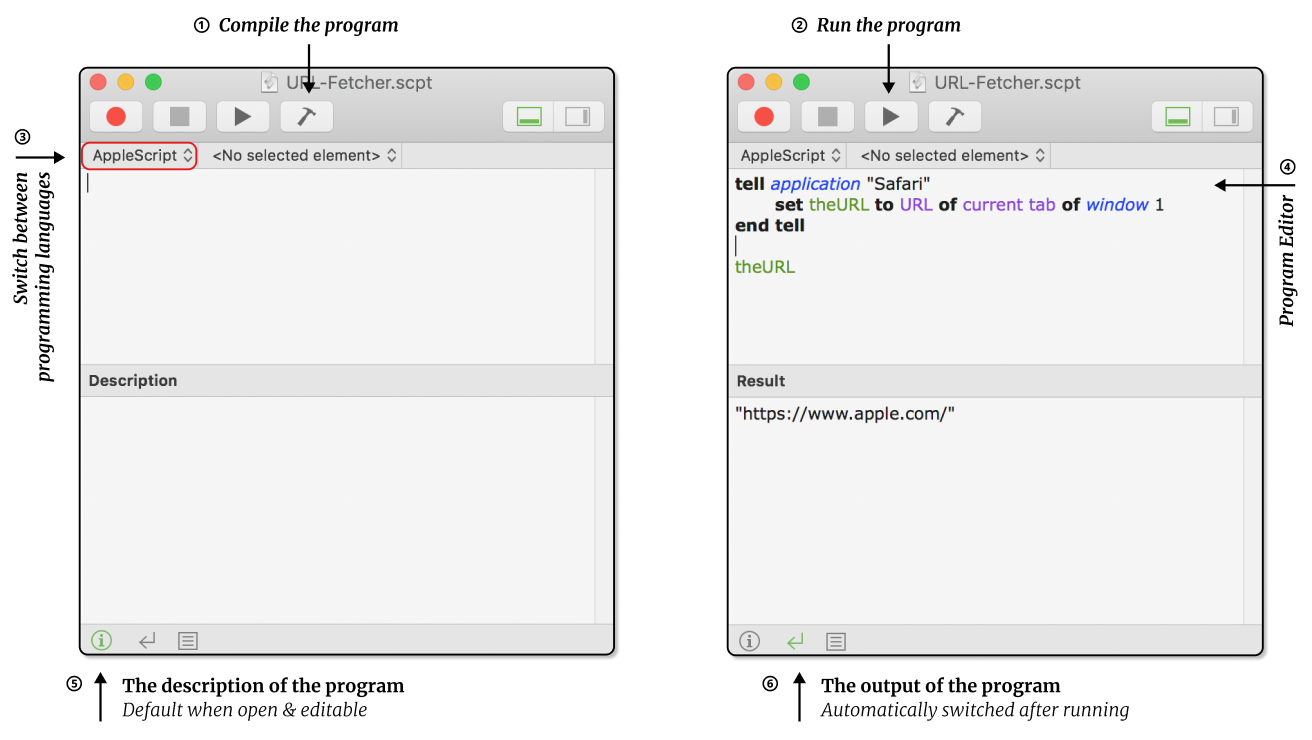
Let’s start with typing the following scripts:
tell application "Safari"
	set theURL to URL of current tab of window 1
end tell
theURL
Basically, it means obtaining the URL of the current tab in the most forward window, aka, window 1. You may find the AppleScript has a self-explaining grammar that you can easily under its meaning by simply reading the code. The core syntax in AppleScript is “tell some application to do something”. And you can also find a detailed command reference on this page.
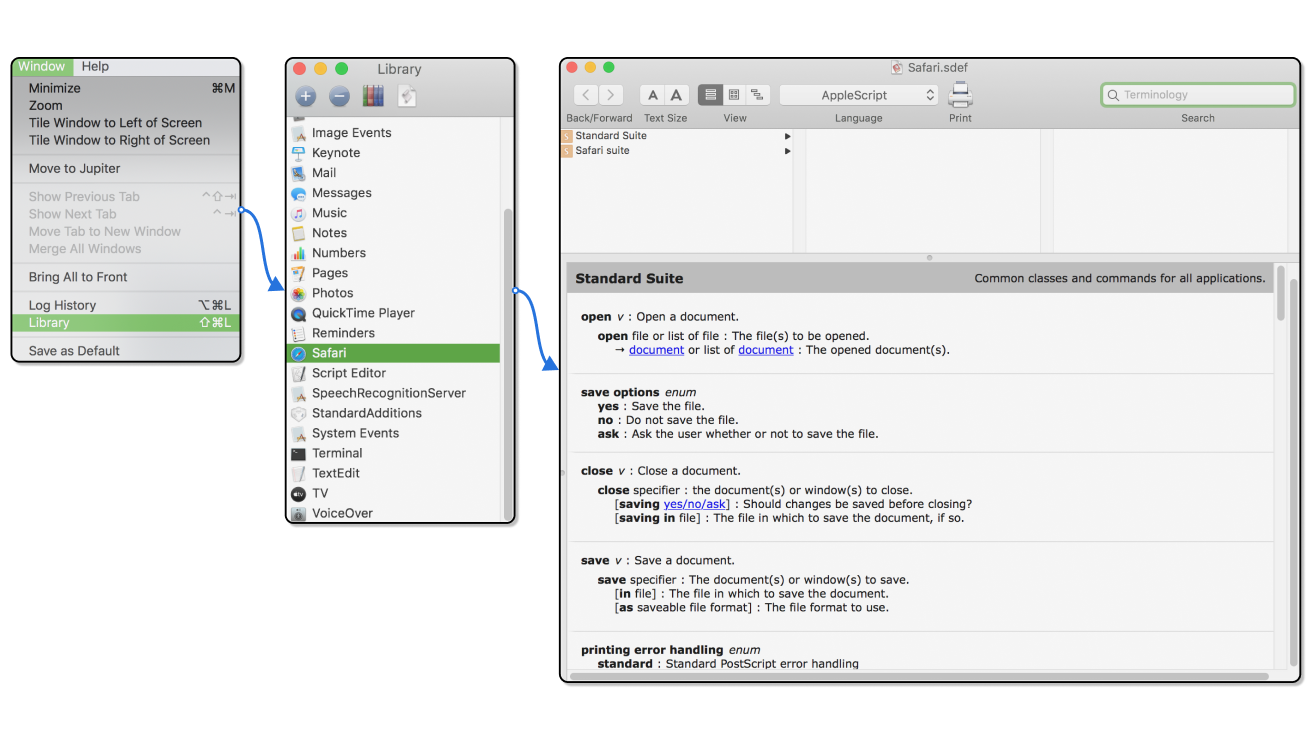
Besides the general AppleScript documentation, it’s also necessary to check the application-specific APIs to interact with them. Conveniently, the Script Editor provides a library interface where you can check the supported functions of an application.
After running the script, the link of the current tab is displayed in the result field. You can now create your own script and play with it a bit.
We can also extract the title of the tab in a similar fashion. After checking the library, we find the name property of a tab stores the title of the page. Thus, we can store this into another variable called theTitle using an analogous syntax. And finally, { and } are used to create a list that combines the two variables.
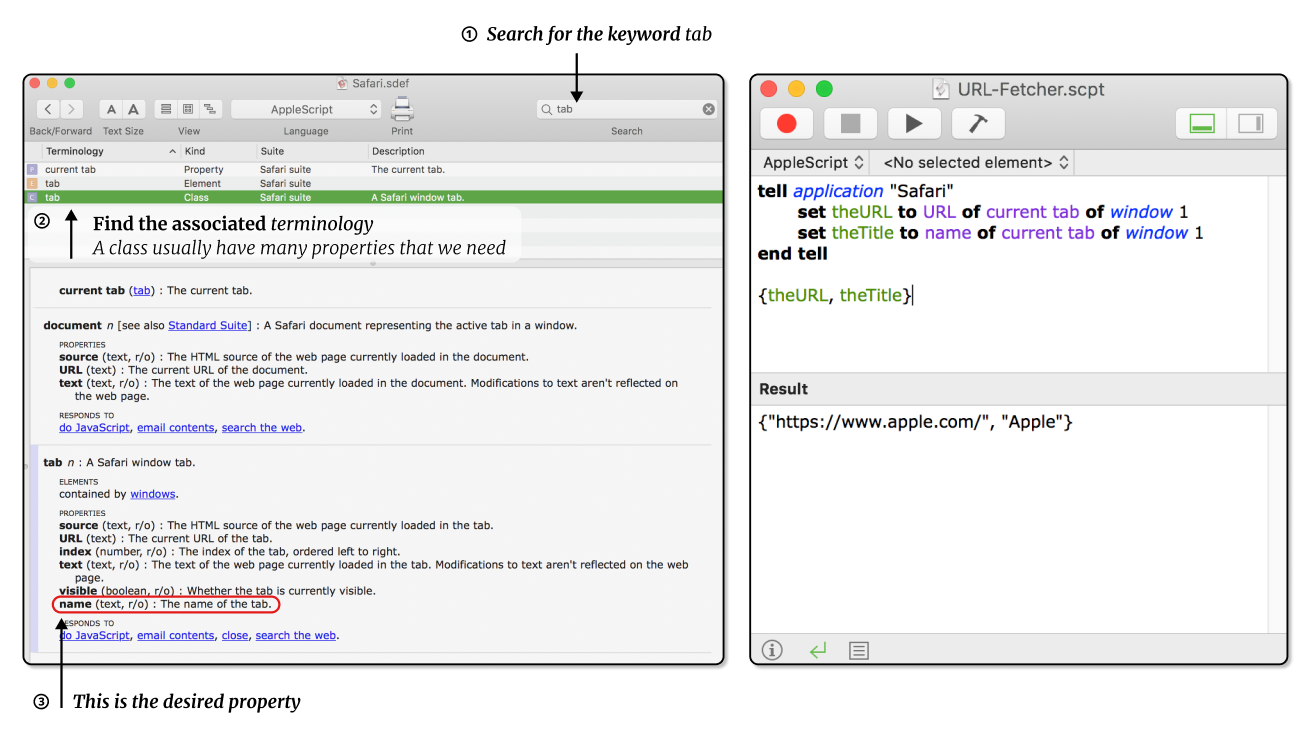
tell application "Safari"
	set theURL to URL of current tab of window 1
	set theTitle to name of current tab of window 1
end tell
{theURL, theTitle}
Selecting the destination Notion page
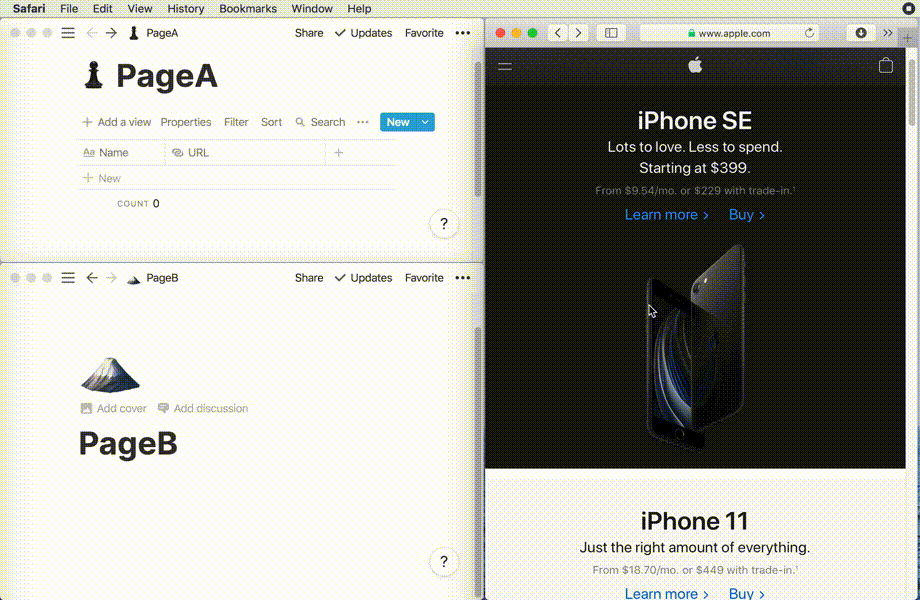
Sometimes you may want to save the content to different pages according to your organization. In this case, having a selection window in the automator could be helpful, as we can avoid creating many different page-specific automators. AppleScript provides with this functionality in the choose from list command.
set pageChoices to {"PageA", "PageB"}
set theChoice to choose from list pageChoices
theChoice

You may also want to customize your selection window, e.g., set the prompt message and default selection:
set pageChoices to {"PageA", "PageB"}
set theChoice to choose from list pageChoices with prompt "Please select the target page" default items {"PageA"}
theChoice
There are several things you need to keep in mind:
- If you hit
cancelin the selection choice page,theChoicewill be set to a boolean variablefalse. - As you may find, the value of
theChoicevariable is not a simple string but a list. You can convert it using the commandas string:set theChoice to (choose from list pageChoices with prompt "Please select the target page" default items {"PageA"}) as string. (Don’t forget the parenthesis.) - And the
choose from listcommand enforces users to make a single selection at a time. If you want to enable multiple choices, you can append the commandwith multiple selections allowedat the end of the 2nd line. When selecting, you can useshift+click to make multiple choices. And the returnedtheChoicebecomes a multi-item list and usingas stringwill combine the two choices into a single string.
Add contents to Notion
As the Notion Mac app does not support AppleScript (when you view it in the library, it says this app is not scriptable), we could not add the URL to the selected page in Notion in a similar way. Instead, we will turn to some other tools to implement this function.
A web-based app like Notion usually provides an official REST API that enables the interaction of contents programmatically. However, Notion is still working on that (it’s in their roadmap) and it is still not available. Therefore, we have to turn to some third-party tools.
We will be using Notion-py in this tutorial. It’s a Python-based API for Notion and it has very nice class designs. And the installation is simple: open your python environment, type pip install notion and hit enter.
In the python program, firstly, we need to initialize a Notion Client based on your cookie token. The token can be seen as a unique identifier for your account and it’s stored on your computer.
from notion.client import NotionClient # Imports the Notion function

token = 'your token'
client = NotionClient(token_v2=token)
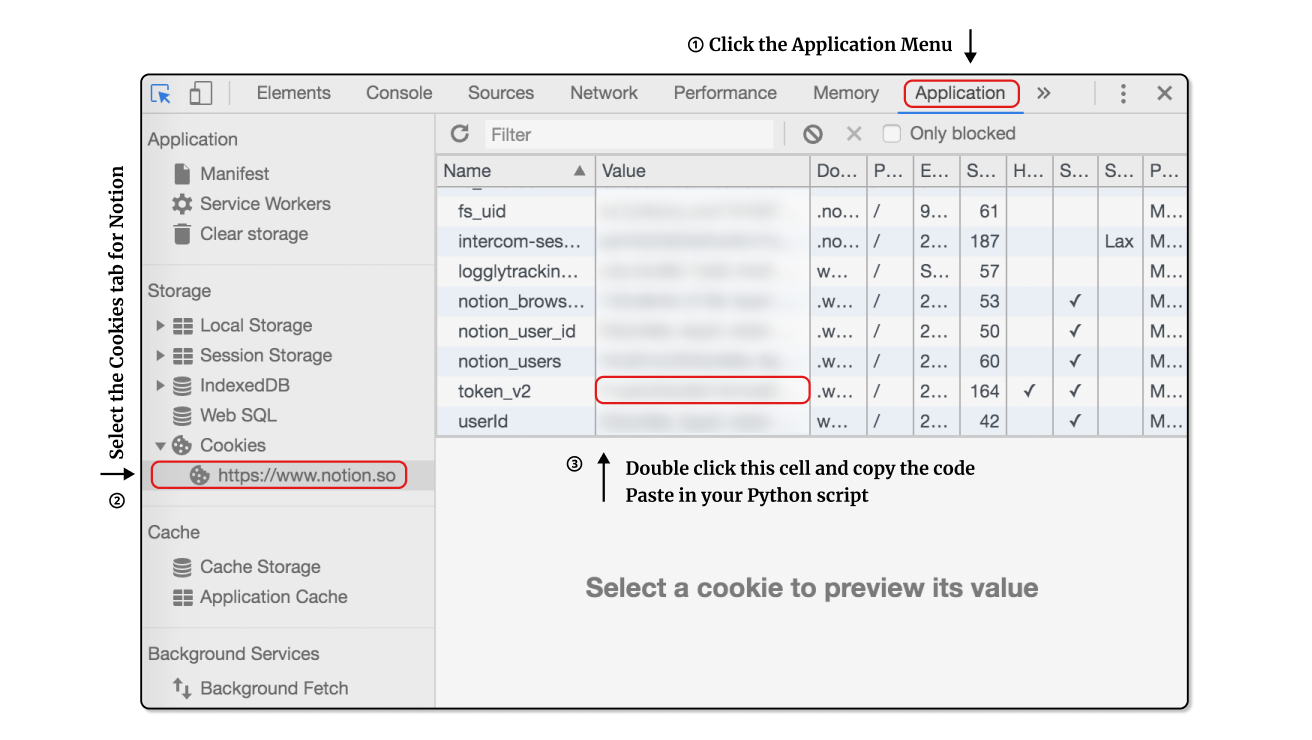
To get the token, the most convenient way is using the inspector tool in Chrome. After logging to Notion in your Chrome browser, click command+shift+c or right click on the webpage and select inspector to open the panel. And you can follow the procedure shown in the diagram to get your token string.
After the initial setup, you’ve established the connection to Notion servers. However, it doesn’t connect to any pages at this moment. Depending on the type of the requested page, different methods shall be called. In this case, I usually use a database to manage links, thus I’ll use the .get_collection_view method to load it.
page_link = 'https://www.notion.so/xxx'
cv = client.get_collection_view(page_link) # if it is a database like page
page = client.get_block(page_link)				# if it is regular page or block
After obtaining the page, you will be able to add contents and modify their properties.
row = cv.collection.add_row() 						# Create a new row in the databse
row.set_property("Property Name", property_value)
row.set_property("URL", url)
The operation for adding contents in a regular page is similar. For example,
from notion.block import TodoBlock
newchild = page.children.add_new(TodoBlock, title="Something to get done")
newchild.checked = True
However, we are writing hard-coded values (property_value, url) into Notion. In reality, we need to get it from some external inputs. To achieve this, we will save the code into a short python script called safari2notion.py and add some additional programs. We hope the code can parse the inputs in the form of command-line arguments, e.g., python safari2notion.py "PageA" "Apple" "www.apple.com", and process them accordingly. The sys.argv command stores the arguments and can be parsed for our purposes.
# safari2notion.py
from notion.client import NotionClient
import sys

# Parsing inputs from the command line
page_selection = sys.argv[1]
tab_name = sys.argv[2]
url = sys.argv[3]

page_selection_lookup_table = {
  'PageA': 'https://www.notion.so/xxx',
  'PageB': 'https://www.notion.so/xxx',
}

if __name__ == "__main__":
    token = 'your token'
    client = NotionClient(token_v2=token)
    page_link = page_selection_lookup_table.get(page_selection, '')
    	  # It is more robust if the page_selection is not a key in
      	# the dictionary.
    if page_link != '':
        cv = client.get_collection_view(page_link)
        row = cv.collection.add_row()
        row.set_property("Name", tab_name)
        row.set_property("URL", url)
        # Remember to configure your database to add the Name and URL property
Combine them together
In the previous sections, we’ve learned 1) how to obtain the page title and URL from Safari, 2) how to create a selection box, and 3) how to add content into Python. And it’s time to move on to combine these processes and build a real safari extension.
The gluing process takes advantage of the Automator software in MacOS, by which you can combine multiple processing pipelines and create complicated automation. After opening the Automator app, in the selection panel, you need to choose the document type as quick action which can be incorporated into other programs. When it’s created, it would be better to change the running from option from any application to Safari, as we only want it to be shown in Safari.
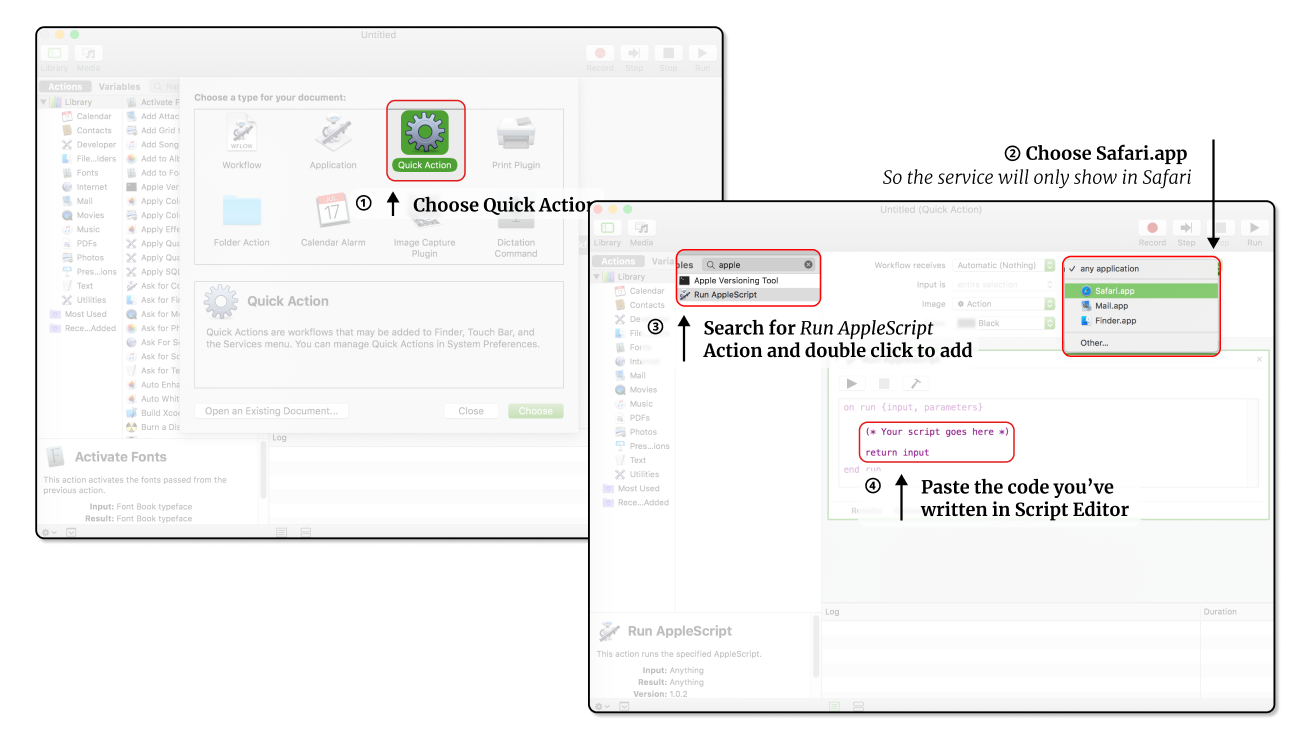
Next, let’s add the selection box and url-fetcher into the automator. You need to find the action Run AppleScript and add it to the main canvas. Paste the code you’ve written in the Script Editor and make some minor modifications to combine the outputs. The only difference is the penultimate line, where you need to return the combined three values {theChoice, theTitle, theURL}.
on run {input, parameters}

    set pageChoices to {"PageA", "PageB"}
    set theChoice to (choose from list pageChoices with prompt "Please select the target page" default items {"PageA"}) as string

    tell application "Safari"
      set theURL to URL of current tab of window 1
      set theTitle to name of current tab of window 1
    end tell

    return {theChoice, theTitle, theURL}

end run
The last puzzle is to send the output from the AppleScript to the Python script. In the automator panel, find and add the Run Shell Script action, and change the pass input mode to as arguments. This means the input to this action will be passed as the arguments of the given shell script. Type python <path to>/safari2notion.py "$@" in the panel. The "$@" means it will send all inputs to this action cell into the python scripts one by one. In this case, the input to this cell is the output from the last action, which is theChoice, theTitle, theURL. Adding "$@" makes this shell command equivalent to python <path to>/safari2notion.py theChoice theTitle theURL, which is exactly what we want.
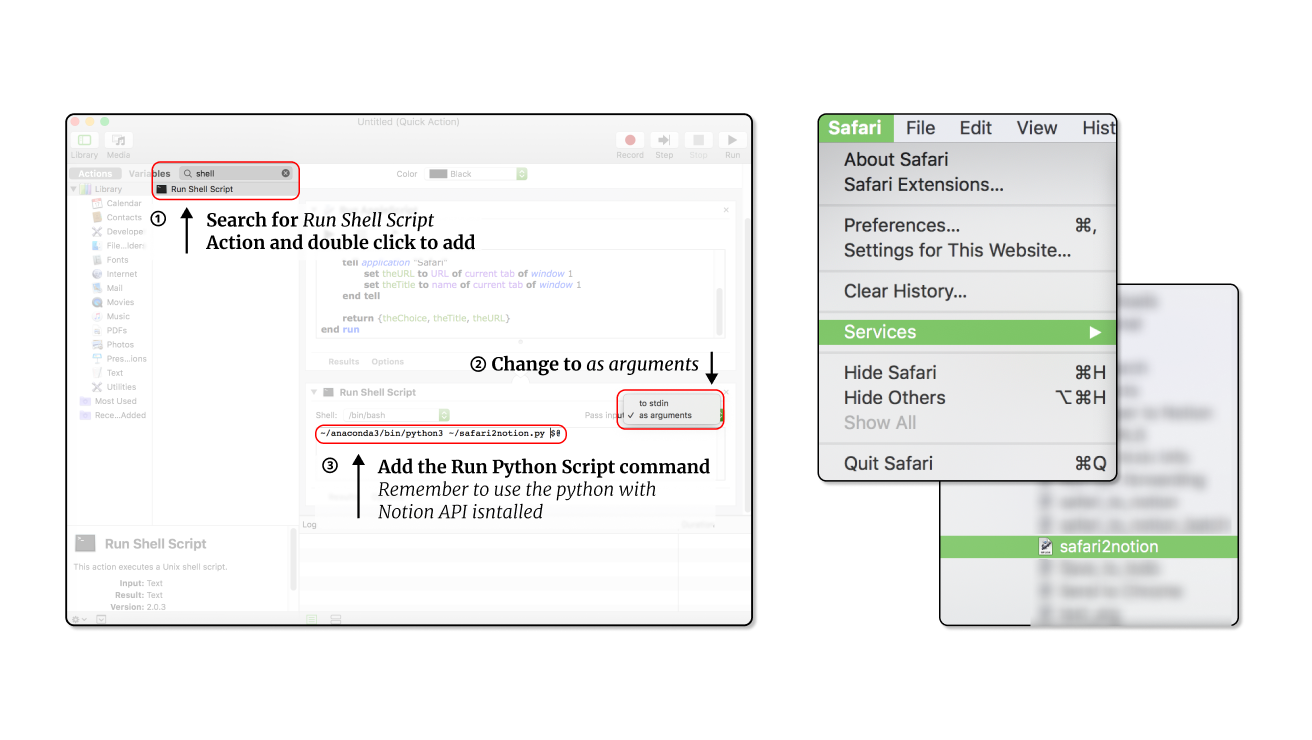
After saving this automator as safari2notion, you can find it in the Services menu in Safari. Let’s try click and run it and check if it is running as expected! And you can consider binding your automator with some keyboard shortcuts, following this tutorial.
Congratulations, you’ve made your own Notion Safari Extension!
Reference
-
Jamalex/notion-py: Unofficial Python API client for Notion.so
-
How do I assign a keyboard shortcut to an AppleScript I wrote?
Acknowledgement
Thanks to Rosen for precious advice during editing.
-
The scripting language supports both AppleScript and JavaScript. In the official guide, they provide examples in both languages. In this article, I would start with AppleScript for its clear and simple syntax. For those who are familiar with the JavaScript, it should be easy to translate them. ↩